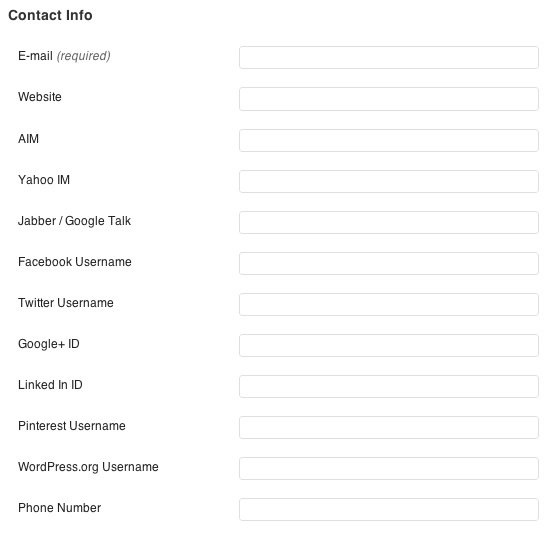
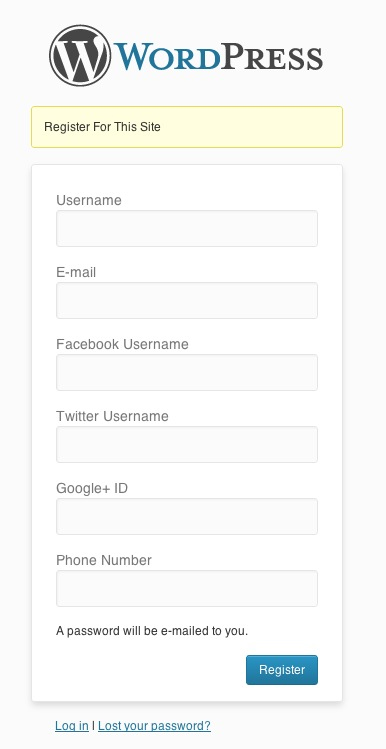
Today I created a new plugin for you. A plugin that deals with users contact methods. Basically when you edit a user in the administration, there’s a “contact information” block. Well, I’d like to show you how to add your own fields there, and to go a bit further, how to show (or not) these new fields on the registration page.
Here is a preview of what we’re going to create:
And to do so, as usual, we’re going to create a nice and simple plugin!
Step 1: Create The Plugin
Create a new folder in wp-content/plugins and call it “custom-user-contact-methods”. Inside this newly created folder, create a file called “rc-custom-user-contact-methods.php”, and open it in your favorite editor software.
Place this content in your empty file. This code simply registers the plugin:
<?php
/*
Plugin Name: Custom User Contact Methods
Plugin URL: http://remicorson.com/
Description: Add custom fields to users "contact" section
Version: 1.0
Author: Remi Corson
Author URI: http://remicorson.com
Contributors: corsonr
*/
Step 2: Define Your Custom Fields
Next, we need to create a variable that will contain our custom fields, the ones to use in the user edition page, and also on the registration default page. Let’s store these fields into a variable called $extra_fields.
$extra_fields =  array(
	array( 'facebook', __( 'Facebook Username', 'rc_cucm' ), true ),
	array( 'twitter', __( 'Twitter Username', 'rc_cucm' ), true ),
	array( 'googleplus', __( 'Google+ ID', 'rc_cucm' ), true ),
	array( 'linkedin', __( 'Linked In ID', 'rc_cucm' ), false ),
	array( 'pinterest', __( 'Pinterest Username', 'rc_cucm' ), false ),
	array( 'wordpress', __( 'WordPress.org Username', 'rc_cucm' ), false ),
	array( 'phone', __( 'Phone Number', 'rc_cucm' ), true )
);
We are storing every field within an array that have 3 parameters, the first one is the field ID, the second one is the field label, and the last one is a boolean information that defines if the field is shown on the registration page or not. You can add as many parameters as you want, for example a placeholder or a required information.
Step 3: Hook The Right Filter
We now need to hook a function to the right filter. In our specific case, the filter is “user_contactmethods”, and the name of the function we are going to create is “rc_add_user_contactmethods”.
// Use the user_contactmethods to add new fields
add_filter( 'user_contactmethods', 'rc_add_user_contactmethods' );
Step 4: Create Our Custom Fields
We now need to create the “rc_add_user_contactmethods” function. It’s the one that will add our custom fields to the user edit page. The good news, is that we stored our fields within an array, it means that the following function will be fully dynamic, and it will be pretty easy to add new fields just by modifying the $extra_fields variable.
/**
 * Add custom users custom contact methods
 *
 * @access      public
 * @since       1.0
 * @return      void
*/
function rc_add_user_contactmethods( $user_contactmethods ) {

	// Get fields
	global $extra_fields;

	// Display each fields
	foreach( $extra_fields as $field ) {
		if ( !isset( $contactmethods[ $field[0] ] ) )
    		$user_contactmethods[ $field[0] ] = $field[1];
	}

    // Returns the contact methods
    return $user_contactmethods;
}
At this step, if you save, and activate the plugin, you should see your custom fields in the user edit page. As we are using the correct hook, we don’t have to create a “save” fields data. So, the plugin is working great for the moment. But i’d like to go a bit further and add the option to display those fields on the registration page. Make sur you check under settings the “Anyone can register” checkbox, otherwise you won’t be able to see the “Register” link.
Step 5: Registration Page Hooks
To add our fields on the registration page, we need to access at least two hooks, and create two functions. One to display the fields, and the second one to save the fields data into the database.
Let’s hook our functions:
// Add our fields to the registration process
add_action( 'register_form', 'rc_register_form_display_extra_fields' );
add_action( 'user_register', 'rc_user_register_save_extra_fields', 100 );
Step 6: Display Custom Fields Registration Page
In the code above we declared two functions. The first one is to display the fields on the registration page. In this part we need to take care of the third parameter of each array in $extra_fields. This boolean parameter tells if the fields has to be shown or not. True: the field is shown, false: the field isn’t shown.
/**
 * Show custom fields on registration page
 *
 * Show custom fields on registration if field third parameter is set to true
 *
 * @access      public
 * @since       1.0
 * @return      void
 */
function rc_register_form_display_extra_fields() {

	// Get fields
	global $extra_fields;

	// Display each field if 3th parameter set to "true"
	foreach( $extra_fields as $field ) {
		if ( $field[2] == true ) {
		$field_value = isset( $_POST[ $field[0] ] ) ? $_POST[ $field[0] ] : '';
		echo '<p>
			<label for="'. esc_attr( $field[0] ) .'">'. esc_html( $field[1] ) .'<br />
			<input type="text" name="'. esc_attr( $field[0] ) .'" id="'. esc_attr( $field[0] ) .'" class="input" value="'. esc_attr( $field_value ) .'" size="20" /></label>
			</label>
		</p>';
		} // endif
	} // end foreach
}
Step 7: Store Fields Values Upon Registration Process
Now that our fields are shown on the registration page, we need, to store their values into the database. This is the aime of the “rc_user_register_save_extra_fields” function. To do so, we need to use the “wp_update_user()” function.
/**
 * Save field values
 *
 * @access      public
 * @since       1.0
 * @return      void
*/
function rc_user_register_save_extra_fields( $user_id, $password = '', $meta = array() )  {

	// Get fields
    global $extra_fields;

    $userdata       = array();
    $userdata['ID'] = $user_id;

    // Save each field
    foreach( $extra_fields as $field ) {
    	if( $field[2] == true ) {
	    	$userdata[ $field[0] ] = $_POST[ $field[0] ];
	    } // endif
	} // end foreach

    $new_user_id = wp_update_user( $userdata );
}
Conclusion
Well, we saw the basics of how to add new fields to the user contact methods, but that’s all. You can for example remove existing fields such as “Yahoo IM”, “AIM” and “Jabber” doing a simple unset(). But you can also add some functions to sanitize your custom fields in order to check for example if the phone number has an appropriate format, if a field is required or not etc etc… Do not hesitate to ask for specific features in the comments!
Oh, and a last thing… if you want to display the data of any of your field, simply use this:
// Param 1 is user ID
// Param 2 is field ID
// Param 3 is there to get a var or an array
echo get_user_meta( 1, 'twitter', true ); 


