

In WooCommerce you can add a product to the cart via a custom link. You just need to use the “add-to-cart” URL parameter followed by the product ID.
This tutorial will show you how to create custom URLs to add simple, variable and grouped products to the cart – as well as defining the add to cart quantity and an optional redirect.
You will be able to see each possible scenario, and also copy/paste the custom URLs so that you only need to replace product IDs and quantities.
I strongly recommend you read through all the post comments in case you’re not sure about something – many people have asked the same questions over and over again e.g. “Is it possible to add more than 1 product to the cart?” (to which the answer is “no”, unless you install a custom plugin) or “Why does my product get added twice?”
With this guide it’s much easier to place WooCommerce add to cart buttons on custom landing pages, pricing tables, blog posts, external websites, and so on. Enjoy!
1) Custom Add to Cart URL: “Simple” Products
Simple products can easily be added to the cart via a custom URL. All you need is the product ID (hover onto the product title under WooCommerce > Products):

URL: Add Simple Product to Cart with Quantity = 1
href=”https://yourdomain.com/?add-to-cart=25&quantity=1“
Note: make sure to change the domain name in the link to your own WooCommerce website URL of course. In this example, product ID = 25 will be added to the cart with quantity = 1.
User will be redirected to the same page unless you have enabled “Redirect to the cart page after successful addition” under WooCommerce –> Settings –> Products -> General – in such a case they will go to the default Cart page instead.
URL: Add Simple Product to Cart with Quantity = 3
href=”https://yourdomain.com/?add-to-cart=25&quantity=3″
In this case scenario, the same product ID = 25 will be added to the cart but with quantity = 3.
URL: Add Simple Product to Cart & Redirect to Cart Afterwards
href=”https://yourdomain.com/cart/?add-to-cart=25&quantity=1“
Note: if you’ve changed the URL of your WooCommerce Cart page, make sure to change “/cart/” with “/basket/” or whatever the custom slug. For this to work you must also tick the “Enable AJAX add to cart buttons on archives” option under WooCommerce –> Settings –> Products -> General.
URL: Add Simple Product to Cart & Redirect to Checkout Afterwards
href=”https://yourdomain.com/checkout/?add-to-cart=25&quantity=1“
Remember, for this to work you must tick the “Enable AJAX add to cart buttons on archives” option under WooCommerce –> Settings –> Products -> General and also disable “Redirect to the cart page after successful addition“:

URL: Add Simple Product to Cart & Redirect to Any Page Afterwards
href=”https://yourdomain.com/page_slug/?add-to-cart=25&quantity=1“
Remember, for this to work you must tick the “Enable AJAX add to cart buttons on archives” option under WooCommerce –> Settings –> Products -> General and also disable “Redirect to the cart page after successful addition“. Then, just replace “/page_slug/” with the slug of your page e.g. “/success/”.
2) Custom Add to Cart URL: “Variable” Products
Here things were originally complicated, but now it’s much easier! All you need is the specific variation ID that you want to add to the cart. Here’s where you can find it:

URL: Add Variation to Cart
href=”https://yourdomain.com/?add-to-cart=88&quantity=1“
URL: Add Variation to Cart (with Quantity = 3)
href=”https://yourdomain.com/?add-to-cart=88&quantity=3″
URL: Add Variation to Cart & Redirect to Cart
href=”https://yourdomain.com/cart/?add-to-cart=88&quantity=1“
URL: Add Variation to Cart & Redirect to Checkout
href=”https://yourdomain.com/checkout/?add-to-cart=88&quantity=1“
URL: Add Variation to Cart & Redirect to Any Page
href=”https://yourdomain.com/page-slug/?add-to-cart=88&quantity=1“
3) Custom Add to Cart URL: “Grouped” Products
A grouped product is a combination of two or more sub-products, and each one can be added with a custom quantity to cart with a custom URL which has a slightly different format from what we’ve seen so far..
You will need the Grouped Product ID, which can be found in the usual way, and also the sub-product IDs.
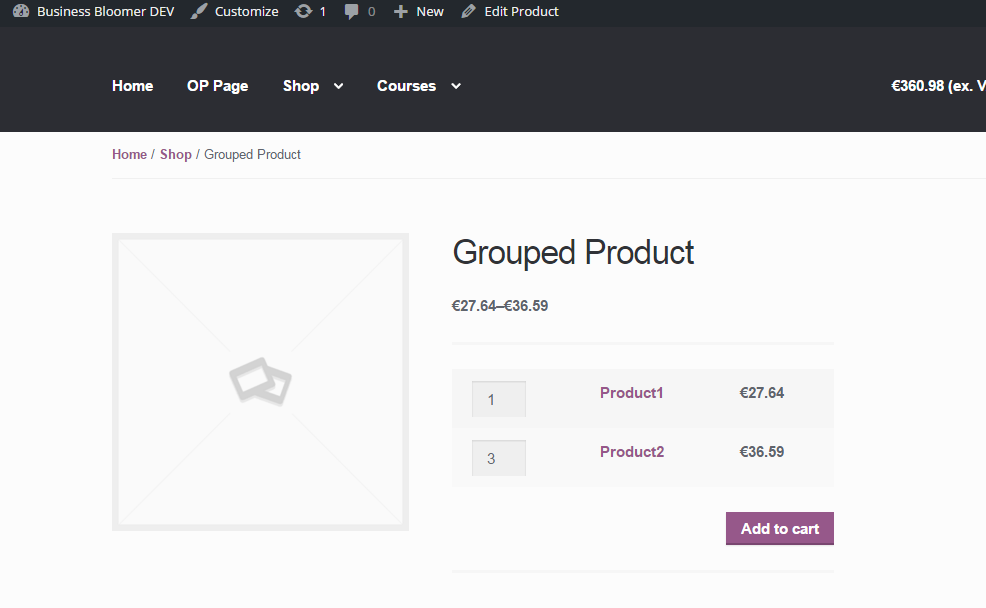
URL: Add Grouped Product to Cart
href=”https://yourdomain.com/?add-to-cart=3111&quantity[1803]=5&quantity[1903]=2″
In this case, we’re adding Grouped Product ID = 3111, and specifically we’re adding 5x of its subproduct ID = 1803 and 2x of its subproduct ID=2.
Note: if you want to add “zero” for one of the sub-products, you still need to specify that i.e. quantity[1903]=0
4) Mini-Plugin: Business Bloomer Add Multiple Products To Cart Via URL
You don’t feel confident with coding? You don’t want to purchase yet another bloated, expensive plugin? Great!
Business Bloomer WooCommerce Add Multiple Products To Cart Via URL is a mini WooCommerce plugin, without the usual hassles. One feature. Lifetime license. No annoying subscriptions. 1 plugin file. A few lines of code. No banners. No up-sells. No WP notifications. Use it on as many websites as you like. Lifetime support. 1-page documentation. No settings.
Quick demo:
As you can see the plugin requires no settings. Install it, create a button/link with the “add-many-to-cart” URL parameter followed by the list of products and their quantities e.g. “=123:2,456:3“, and magically see your WooCommerce Cart filled with all the products and quantities you specified in the custom URL. Simple!
Credits
Thanks so much to these amazing folks:
- Remi Corson: https://www.remicorson.com/add-woocommerce-variable-product-with-variations-to-cart/
- Nicola Mustone: https://nicolamustone.com/2015/09/18/creating-custom-add-to-cart-url/
- ProserveWeb: https://proserveweb.com/create-woocommerce-link-add-product-cart-redirect-checkout/
- Maarten B: https://businessbloomer.com/woocommerce-custom-add-cart-urls-ultimate-guide/#comment-170443